Which is your most important item of tackle – Rods, reels, rigs, bait?
No, something far more crucial. It’s something you cannot buy! It’s that tiny little insignificant looking number one most important holy of holies? Yes your one and only connection between you and the fish.
Put simply, the finest tackle in the world is totally useless if your knot is iffy. If you are like many of us you may shudder at the thought of having to learn to tie a new unfamiliar knot. The guy on the bank made it look ever so easy didn’t he? Tied it in seconds. ‚Oh‘ Stuff it! I’ll tie the one granddad taught me, its a lot easier and well, it’s only a knot aint it? Sound familiar?
Do you want to tie the best knot for the job? A knot that strangulates and weakens your line least of all? A knot which will not let you down when the fat lady sings along with your line as you apply maximum side strain? Of course you do…. but I guarantee you won’t want to peer into the dark side of knots, because when it comes down to knots its no-man’s land of confusion where many things just don’t add up … But why? The reason is simple; there is no best knot for every single line. Due to the enormous differences in chemical make up every individual line, be it braided or monofilament in each breaking strain has its own preferred unique knot. Select the right knot for the line and that will give you its highest possible breaking point.
Which knot to use
To bring an air of sanity to the equation we have developed if you like an industry standard for knots. The following knots are highly recommended; they are kind to line and give you a sound non-slip connection. All offer high breaking strains with the minimum of strangulation.
For Eyed Hooks – The No knot or Knotless knot. Strong, simple to tie, excellent shape for presentation leaving you with the bonus of a ready-made ‚hair‘.
For Eyed hooks – The Palomar knot. A brilliant unique knot, highly recommended for all lines. Extremely strong, gives 100% line strength, very easy to tie, amazing shape, when tied there is almost nothing there. Used by many who require the highest knot strength possible.
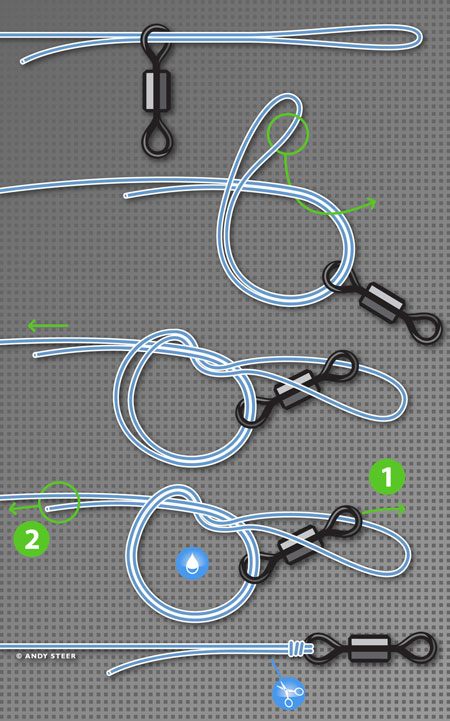
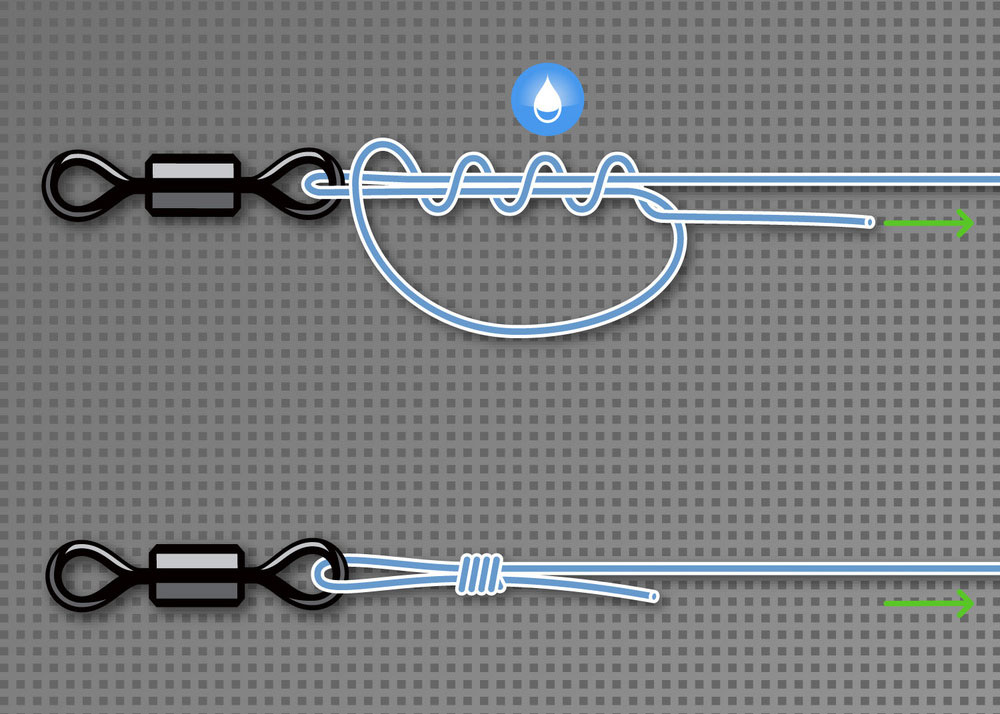
For Eyed Hooks And Swivels – The Four Turn Grinner or Uni Knot. Very strong when combined with braids , easy to tie, good shape. Does not work well with fluorocarbon.
For Loops in Stiff Rigs – The Non Slip Loop Knot. Superb. The strongest loop knot you can tie. Used by big game anglers worldwide. Easy to tie, far stronger and more reliable than the old fashioned strangulating figure eight knot that can substantially weaken line.
Tying good knots
You do not have to be able to play the pianoforte in order to tie good knots. Even if you have ten sausages to pick your nose with you will find all of these knots easy to tie.
Practice tying knots at home, at first with some old spare line, the thicker the better, even smooth cord or string. Cadge or buy a large sea fishing hook or swivel, the bigger they are the easier it gets. Once you have learned the basics scale down to smaller hooks and finer line.
New skills
You will amaze yourself how quickly you can master your new skills. Usually following a dozen trials you should be able to tie your knot with complete confidence. Continue to practice when there’s nowt on telly. Try tying them with your eyes shut, master that stage and soon you will be able to tie them in the dark, ready for the ultimate night to arrive when your batteries run flat!
Relaxed tying
Avoid holding the hook and line using a vice like grip; all this does is make the job more difficult. I have witnessed anglers tying rigs using so much pressure veins have stuck out on their foreheads. Relax; work slowly, rhythmically and methodically. Talking of vices (steady on!) I cannot recommend highly enough the use of a simple inexpensive fly-tying vice. It acts as a third hand, invaluable for tying intricate rigs and really comes into its own when using smaller hooks. You can pick up a good second hand one for a fiver.
Super Glue
The only reason for applying super glue to a knot is because the knot has not been tied correctly in the first place. It may come as a shock to you but I, along with thousands of others, have never had the need to glue a knot. The knots we recommend are designed not to slip and unravel, and when tied correctly will never slip.
So why do you need super glue for knots? I have often read the phrase ‚add a touch of glue for extra security‘. Only poorly designed or poorly tied knots that will slip need ‚extra security‘. In over forty- five years of fishing I have never lost a fish due to the knot slipping. Super glue is an excellent aid for bonding beads, tubing, and a whole host of rig paraphernalia, but you really don’t need the stuff for knots. The knots you will be tying all have one thing in common …they lock…permanently. Use glue for what it’s designed for, but not for knots – you just don’t need it.
A well-designed braided line is constructed with careful attention paid to the weave. When the line comes under pressure the weave should start to contract and close, as pressure is released the weave relaxes and reverts back to its original state. When super glue is applied to the weave it freezes the fibres, its all-important movement is locked solid in a block, it cannot expand or retract because the glue restricts all normal movement. As a braided hooklength comes under maximum pressure it has a safety net consisting of a tiny amount of stretch. The application of super glue removes the safety net. You have been warned!!
What harm can it do is not the issue … the question is what good does it do? The answer is none – and anyhow, it stinks!
Knot Terminology
Leading line… the section of line you are working with. The moving line that you manipulate to form loops and turns. The active section. Standing line… the section of line that sits underneath the turns, The static line. Closing … applying pressure to bring the turns together when forming the knot. Tag end… the bit of line that is left after the knot is completed. The piece you trim off, the waste.
Tying Tips
Unlike braided line, monofilament suffers if it is not lubricated; it is, however, good practice and good management to lubricate all types of line before closing down knots.
Lubrication
Before you apply tension when closing down knots, lubricate the line. Moisten the sections of moving line and the line that the knot will travel over with saliva. Once lubricated the knot can easily travel to the eye without creating friction. Many carefully constructed knots tied in mono are needlessly ruined at the final stages by anglers fully closing, tightening and compressing the knot barrel far too soon.
Tight barrels and pig tails
A knot that has been prematurely tightened is the sole reason for curly tails that appear above hooks and below the swivel; this is clearly evident in poorly tied mono hooklengths. The barrel of the knot has far too much grip on the standing line. As it travels to the eye its strong grip creates friction, crushing, weakening and distorting the mono creating a pig-tail.
To avoid pigtails always form a partially closed knot and only apply full pressure when the knot has reached its final destination and fully bedded down.
When closing knots with mono assist the knot barrel to the eye. Push the barrel using your fingers whilst taking up the slack. This procedure will help to keep mono from distorting.
Get a grip
- Always leave yourself enough working line to leave a decent tail end to grip for tightening.
- Short tails are very difficult to grip when applying pressure to close the knot correctly.
- Once your knot is fully compressed do not cut the tail too close to the knot. All knots benefit from a decent tag. Avoid micro tag ends; they invite slippage leading to disaster.
Dodgey eyes
When removing hooks from packets carefully examine eyes and points. Discard all hooks with ragged burrs on the inside of the eyes; they can damage your line when closing down. Reject all hooks with eyes that have a clear gap and not fully closed, reject those that could catch the braid or scratch the mono. In these days of mass production it is a sad fact of life that a number of hooks have to be thrown away due to poor quality control. Why risk your fish of a lifetime because of an iffy hook?
Twice through eye
When tying grinners all braids benefit from passing the line not once, but twice through the eye of hooks or swivels. The extra pass of line through the eye will share the load, reduce strangulation and give a valuable increase in breaking strain. This is why the Palomar is such a good knot because it consist entirely of doubled line.
Snagging
Ensure the line travels smoothly through the eye without any degree of snagging or snatching. Should the line snag or become ragged examine the line position inside the surface of the eye. You may find the first turn of line has slipped into the sharp recess or gap of the eye preventing easy passage. Reposition the offending turn before proceeding. Although entirely suitable for use the vast majority of eyes in many commercial hooks are never completely closed, this can on occasions allow finer lines to slip into the recess.
Knots
Blood Knots
For instance take Blood knots; at best they cope with most brands of mono. However, use them with Multi-strand or high strength braids and they can be disastrous, torturing and strangulating the filaments to such a degree the line can sever itself 70% below its potential breaking strain!
On the other hand tie a blood knot to fluorocarbon and it is remarkably efficient whereas the normally trustworthy grinner that works extremely well
with braids will reduce the strength of fluorocarbon by 50%!
How many different brands of line are out there? How many breaking strains? Strewth, how many different knots do you need to learn? It’s not only Blood knots that can be dodgy; there are many others out there capable of inflicting severe GBH to many types of line. Virtually all knots weaken line in various degrees. The question is, which ones weaken least of all, and which one is best for you?
The ‚No Knot‘ or ‚knotless Knot‘
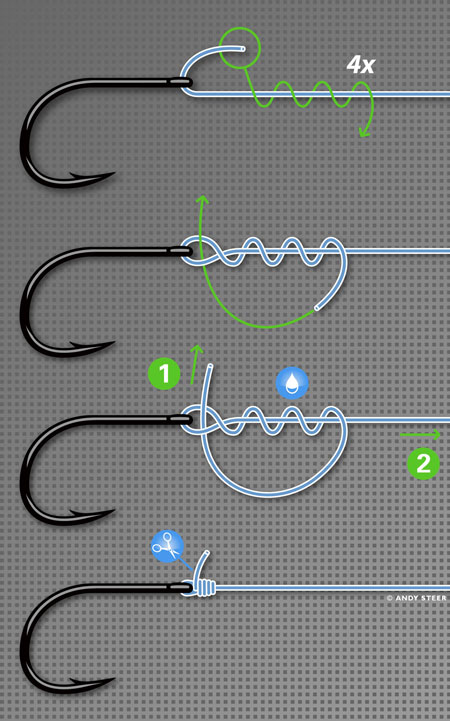
You need to tie a loop in the ‚hair‘ before tying the ‚No kno‘. Form a hair loop by folding the leading line back on itself to form a length of doubled line. Create a circle by overlapping the doubled line and pass one turn of the leading end through the circle to form an overhand knot. Pull steadily to close down to make your hair loop. Trim tail for tag end.
Tip … For a good visual guide to the length of hair you require, mount the bait to the hair loop temporarily, and then measure ‚hair‘ distance before you start to tie. (No need for a bait stop unless you have drilled the grand canyon!). Remove the bait once desired hair length is chosen and proceed to tie the hook.
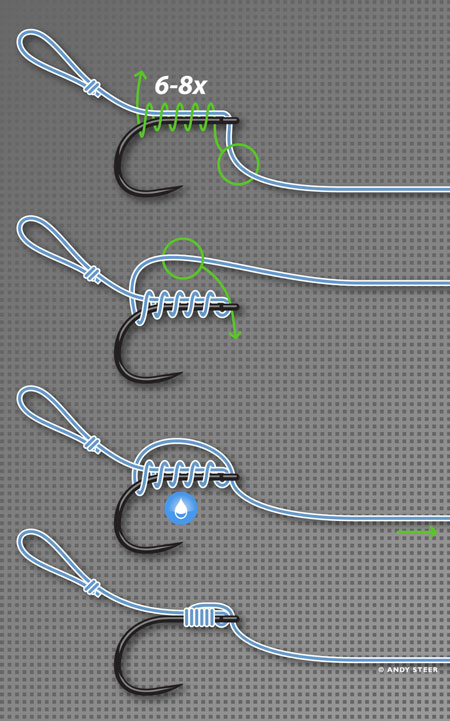
The No Knot with „Hair“
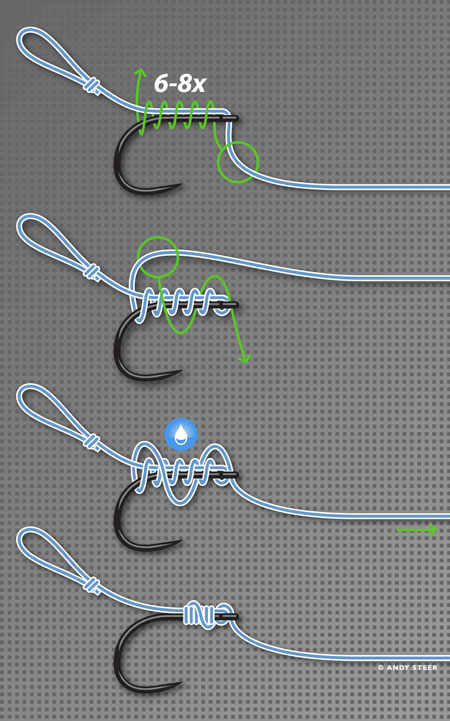
Lay the leading line along the shank of the hook. Thread line through the eye ensuring line exits from inside of eye. Determine length of hair you require. Once the hair is held in position make your first turn (whip) over the shank. The direction that you wind the turns (clockwise or anti-clock) will be determined by the closing point of the eye. Ensure the first turn is snuggled up tight against the opposite side to the gap of the eye.
Continue winding turns down the shank away from the eye.
Keeping sustained tension on the line make your final turn. Grip turns to stop them unravelling. Pass leading line back over the turns and through the eye to exit on the inside.
Using steady pressure ease the leading end tight to compress the knot.
Finally to complete your rig tie a swivel to the end of your hooklength using a grinner knot, see grinner knot instructions.
No Knot Tips
Some brands of hooks have poorly closed eyes with a tiny gap evident. When using low diameter lines ensure the line cannot slip through the gap and into the eye when making your first turn. If in any doubt simply reverse the direction of turns by whipping anti-clockwise, towards yourself, this will prevent slippage-taking place.
When whipping along the shank apply constant sustained tension to each turn. Ensure all turns lie parallel, closely snuggled up. If a loose turn becomes evident simply unwind to your last good turn erasing the problem area. Once done, continue to wind.
How many turns you make is dependent on the size of your hook, your chosen angle of the hair from the hook, or the diameter of the line you are using. Large or long shank hooks obviously require more turns than smaller hooks. Regardless of hook size whip at least five turns along shank for total knot security
Many anglers‘ preferred method is to wind sufficient turns only stopping when they are happy with the angle of the hair. As a suggested starting point try making your final turn a few millimetres above hook point level. Those who require greater degree of ‚hair movement should use less turns for a higher hair exit point. After completing your turns should you find that the hair is too short simply unwind to the eye, reposition hair length and start your turns again.
The Four Turn Grinner Knot
Very good for anglers using braided hooklengths.
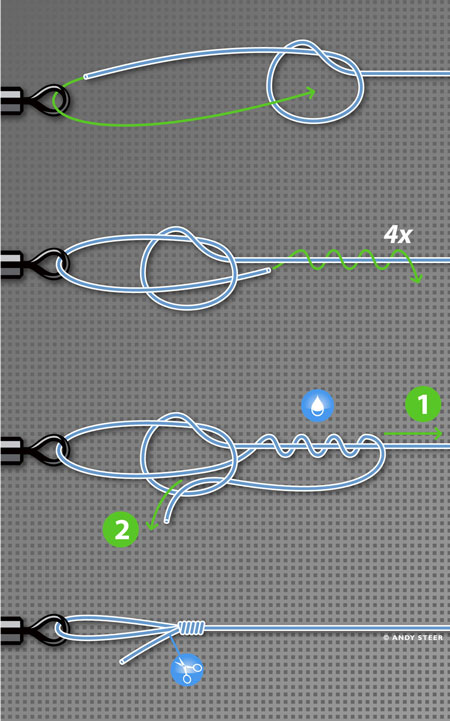
Pass leading line twice through the eye leaving a decent length of material to work with. Bring leading line back away from the eye and position it to run parallel with line. You now have two separate sections of line, the standing line going into the eye and the leading line coming out of the eye. Using finger and thumb grip the hook along with the two separate sections to represent a length of doubled line. Once held allow the leading line to simply drop down vertical and hang loose from the main doubled section. Pick up the dropped line and lift it back up to sit alongside the standing line to create a circle (open loop). Using finger and thumb grip the top of the circle along with standing line and now you are ready to put your turns through the partly formed grinner. Making over and under turns pass the leading line in a clockwise direction to coil around the top of the circle and the standing line four or five times. Once your final turn is completed pass the leading line through and out of the circle to finish construction ready to partially close the knot. Tip… When forming a loop for the grinner make it large to begin with, (its easier to pass line through big loops). As you become more proficient and your tying speed increases reduce the size of the loops.
Partially closing the Grinner
To close down a grinner draw the knot together by applying slow steady gentle pressure to the tag end. The turns you have made will start to twist, contract, and gather together snake-like in ever decreasing coils to form the main body or barrel of the knot. Apply a slight amount of tension to the doubled line from the eye to give good shape to the barrel. Do not pull too hard on the hooklength or tag end. Heavy pressure at this stage will do nothing but create a tightly compressed knot barrel; this in turn creates curly tails in mono. Curly mono problems… see tying tips. The knot barrel should be perfectly formed but not over-tight, it should be firm enough to handle but have sufficient slack and be loose enough to travel freely and smoothly without hindrance to the eye of the hook or swivel. Bring the knot to the eye by applying slow steady tension to the standing line. Do not snatch. When the knot barrel reaches the eye and cannot travel further apply firm tension to both standing line and tag end to fully close the knot. Finish the grinner by using a sharp blade or scissors to trim off tail for tag end.
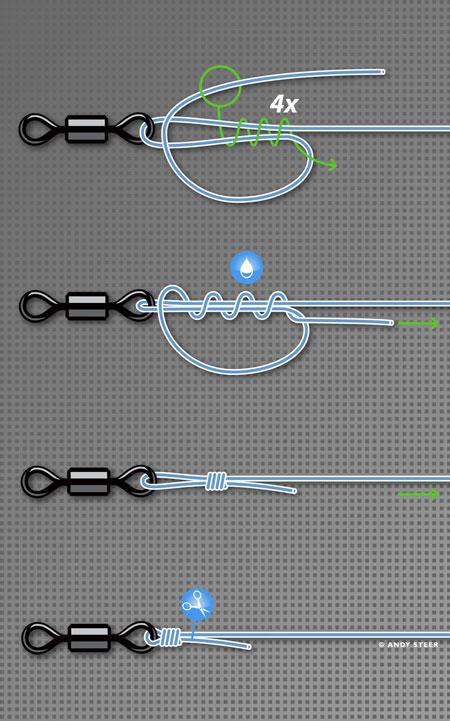
The „non Slip“ Loop
Note ‚up until this point in time this knot has never appeared in any UK angling publication. Learn to tie it and then you can teach the old hands on the lake, they will be well impressed I can assure you. About 99% of anglers who tie loops for stiff rigs use the traditional bulky Figure of Eight knot. They fish on blissfully unaware that their chosen knot has severely strangulated, weakened and reduced the breaking strain of the line. When using large diameter strong line for stiff rigs any loss in strength is countered by the thick mono they use, although much weakened most of the time it still has sufficient strength to play and land most fish.
However, when scaling down to say 10lb, 12lb, or 15lb, fish are often lost due to the knots poor design. The Non Slip Loop Knot has no such weakness; it offers near maximum line strength. It is easy to tie, it’s not bulky and, more importantly, it does not weaken or strangulate the line. For decades it has been used in saltwater by big game anglers using very light line to subdue monster tarpon, marlin and other hard fighting turbo powered creatures who rip line off the reel at a rate of knots. They use it for one reason, because it’s the best and strongest loop knot possible to tie when chasing line class records.
Any angler who uses loop knots and is serious about catching big fish should learn to tie this superb knot and dump the notorious figure of eight loop into the bin where it belongs, RIP.
Should you doubt how good this knot is then prove it to yourself. Take a piece of line and tie a Figure of Eight Knot in one end and a Non Slip Loop Knot in the other. Place a screwdriver through each loop and pull each knot against each other. If you have tied them correctly do not be surprised when the line tied with the figure of eight will break every time, often with minimum pressure.
To tie the Non Slip Loop Knot, form a simple overhand knot and partially close it but do not pull fully tight just yet. Close the overhand down enough to leave small circle large enough to pass a section of line through. At this stage if swivel is required pass attach it by passing the leading line once through eye. Create a loop by passing leading line back through the top of the open overhand knot to exit below open knot. Ensure the leading line enters the overhand knot on the same level as it came out. Wind four turns of leading line around standing line below open knot. Pass leading line back through open knot.
How to tie the perfect Palomar Knot
The Palomar has proved to be one of the best knots to tie with a wide variety of modern lines. Because it is constructed entirely from doubled line the knot is kind to mono and braid giving extremely high strength with the minimum of strangulation.
As thousands have discovered with a little practice it’s a simple knot to tie and will not let you down, however many are unaware that it’s also very easy to tie wrong. If tied incorrectly the finished knot can actually weaken the line resulting in a substantial loss of strength. To avoid this here is an important tip when tying the Palomar.
Once you have formed the knot and before you start to tighten the shape should resemble a distorted figure of eight. The figure of eight shape should have two pieces of line that run parallel with each other.
Holding the doubled line (mainline and tag end) gently pull and start closing the knot down.
As you continue closing down the doubled line forming the figure of eight becomes smaller.
At this point look carefully at its progress. You will notice that of the parallel lines is closing down much faster than the other causing the other to lag behind. Why is this happening?
Palomar Knot
The reason is that the two sections of parallel line are not equal in length. Imagine the figure of eight shape you have created is similar to a two lane round running track. The section of line closing down the fastest is like a runner on the inside lane. He does not have as far to run as guy on the outside lane.
As you pull to on both ends to close the knot and notice one of the sections becoming loose stop pulling. To make the sections of line parallel again simply pull on one of the ends to bring them together again.
Continue to close down the knot by apply tension to both ends of line making minor adjustments to one of two ends as you go. When the Palomar is fully closed down there should be no loose tag ends to tighten.
By tying it in this manner you will avoid the dreaded loose loop. This is the loop that occurs when both running lanes have not closed down together. When this happens many anglers simply pull on the tag end to close the loop thinking that’s OK.
What they don’t realize is that when you tie it correctly with the figure eight shape perfectly closed down all the way with no loose ends, the line can be as much as 40% stronger. As an example 12lb Krystonite will break at 14lb with a correctly tied Palomar but if tied wrong could break as low as 9lb. All of these knots have been tried tested and trusted by many experienced anglers. Use them with complete confidence for they will not let you down. After tying your knot examine it carefully. Should you be in any doubt scrap it and start again. For the sake of a minute’s work why risk losing the fish of a lifetime when it may be your only chance. The old adage ‚practice makes perfect‘ has never been more correct when applied to tying knots.
